16 July, 2010

Hair Spray

Just thought I'd let you all know, I use way to much hairspray. I probably should have grown up in the 80's, I think I'd fit in.... I don't know, maybe it comes from my years of dancing or somthing, but I just like everything plastered smoothed into place (even if that place is messy and loose, I don't like things moving halfway through the day).  It's gross but I probably spray a continuous mist for at least thirty seconds everyday (gags most people, but I don't mind)!

For years I have been using TRESemme hairspray. It's really affordable and works like a charm. They even have an Ultra Fine Mist formula, which is a great idea if, like me, your going to overuse the product. At least that way it doesn't get all globby and thick looking. However, for like a month I have been noticing a ton of build up on my hair, and not the white flaky kind that you would expect. Basically, even after a good washing, the shaft of my hair feels sticky and coated (so bizarre). I know, I know, your probably thinking "just don't use so stinking much hairspray!" Well I really don't think this is the problem, Ive been using the same product and amount for at least four years straight and I am just now having problems.

Of course clarifying shampoos and such work just fine to get rid of the build up, but they are hard on my hair and I really cant use them comfortably more than once, SOMETIMES twice, a month.

I haven't noticed any difference in the performance of the hairspray, still holds everything just the way I want it! So I'm wondering, is it possible that my hair has just become used to the product? Or did they maybe change the formula, hence the new build up?? ...I'm so confused.

Anyway, I bought new hairspray, Herbal Essences Tousle Me Softly. Totally works just as good as my usual (although I do miss the aersole bottle....)  and best part: NO GUNKY BUILDUP!

So that's my story for today.

Has anyone else ever had a similar experience? What type of hairspray do you use?

Beads, Braids & Beyond's GiveAway

Nikki over at Beads Braids and Beyond is celebrating the fact that she now has 1000 followers! Isn't that exciting? As part of her celebration she is having some pretty amazing giveaways, one of which is for Curlformers!! These look like the most amazing curlers ever and I have really wanted a set for a LONG time but I cant justify buying them on my starving student budget. So I am hoping my luck will turn out and maybe I can win this giveaway!!! (by creating this post I get an extra entry ;) ). So to anyone reading this, go check out Nikki's blog, she is very talented and does a WONDERFUL job caring for her DD's hair. But, don't enter the giveaway, cuz then I get less chances of winning those bad boys (jk) !

08 July, 2010

Punk'ed Up Pony

The punk-ish, rocker look is really in right now. I don't think this look really suits me, but it was totally fun sporting this do for a day, and I think it looks really great on a lot of girls. 
 
To do this one you are gonna need straight, straight, straight hair! Flat iron till your satisfied. 
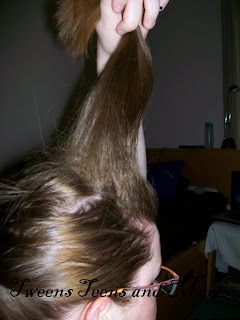
Now section your hair off from ear to ear across the crown. Secure the top half out of the way.
 Now take about half of the remaining hair and tie it off in high, tight ponytail. Make sure that bad boy is high up on your head. I like to use the clear Ouchless elastics because they are easier to hide, but any type will do.
Then take the bottom half  and comb it up and add it into the original ponytail. By using this two step process, your ponytail will end up appearing fuller (exactly the look you are going for here).

Now unclip the front half of your hair. Section out the middle chunk of your hair (the bang section), clip the side two pieces out of your way. Now back comb and spray the junk outta your bangs.  
 
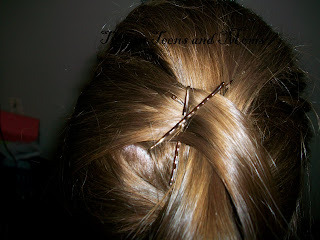
Use a rat tail comb to smooth this bit back and pin into place. X-ing your bobby pins will give you better hold.
Then release one of your side sections, spray it then rake it up and over your pumped up bangs. Use a bobby pin X to hold it in place. Repeat on the other side. Adjust the tails of all three pieces to cover your ponytail.
At this point, you can rat up the tails from your front half of hair to cover your ponytail holder better. For extra poof, rat up the ponytail some too. Add spray and you’re done!
Here's the look from the side: 
 And the front (I really think the eyeliner enhanced the look haha!)

03 July, 2010

Wrap Around French Braid Variations 1&2

Remember how I said I have a bunch of ways to switch up the Wrap Around French Braid? Well today I will post two new alternatives for you. If you are not sure how to do the braid check here.

Ok, option 1: Dont finish in a braid, do a simple pony tail instead:

Option 2: spice up that pony tail by creating a topsy tail (pull through, knot, flip, whatever you call it). If you have the tool you are set. If not, simply reach thumb and pointer finger up hair behind a loosened ponytail, grap the ponytail and pull it down behind itself, then tighten everything up.
This variation is especially helpful if the braid gets a little messy in the front because it kinda hides everything.;)

I know these are both just simple side ponytail ideas, but with the french braid running across that back of your head it really dresses it up. Trust me, people will compliment it!

What's your favorite versitile style?

29 June, 2010

Wrap Around French Braid

This is one of my favorite styles! It works on both wet and dry hair, looks good with inside out (dutch) or regular french braid, and I have a bunch of ways to change up the look! Today I'll demo the regular french braid on dry hair ending in a simple braid.
Start with your natural side part, make sure hair is well smoothed out around your head or things will get a little funky on you as you braid. On the side with the least hair, part off a section to start your braid (part diagonally down past the ear)
Begin your braid as normal, and when it comes time to add hair, add a tiny amount from the bottom. When adding from the top, follow your original part line, try to grab a long thin strip every time. The goal is to keep the braid as close to the hairline as possible. (this picture shows the first bit of added in hair)
Continue french braiding around the head.  When you get about half way around your head, you will start struggling (unless you have strangely long arms!) So at this point, be patient, think about what you're doing, and reposition your hands. The trick is to remember what strand to cross next. (You will get the hang of this switch and I swear its the only challenge in this do)
 

When your braid reaches the second ear, stop adding hair to the bottom strand of your braid (other wise your braid wont sit nicely behind your ear, it will hang goofily over top your ear :S). There tends to be extra hair at the top that's hard to incorporate into the braid, just cheat and add large section and tuck things as need be. Finish off your braid regular style and tie it off with a hair band.Add some hairspray all over and VOILA!

Here's what you will have in the back (you can braid a lot tighter if you prefer that look, or start with wet hair):

 
This is the side you started on: 
Let's finish with a dorky picture of myself (and hope together that my mannequin gets here soon!)
Check back in a few days to see some variations. 

What do you think? Anyone gonna try it out?

25 June, 2010

Sending Out Positive Vibes

So, I have been dealing with some personal things lately, quite stressful, and as such, I have just been feeling really down! I didn't feel like creating a post for a bright cheerful hairstyle this week.
I read somewhere once that when you are feeling down, one of the best things you can do is compliment someone else. I know, sounds a little backwards right? Well the theory is: making someone else feel good results in you yourself feeling better. I figured instead of posting my own do this week I would spend a little time talking up some talented people that inspire me. (If the complimenting doesn't work, looking through their beautiful do's will definitely heighten my spirits!)

I would like to begin with this disclaimer: there are a TON of talented hair bloggers out there, but these are the four that caught my attention first. I am a busy person, so I can't stalk everyone!
What follows is a brief intro to my four favourite hair bloggers and a sampling of my favourite do's from each. I hope you all enjoy, and get inspired to create some jaw dropping styles in your own hair!

Adopt-a-Do: Cute Girls Hairstyles
: this was the first blog I ever read, therefore I feel a little attached... Plus, her beautiful girls are growing up, so she is all about the tween flair now. This is great for me, because these do's are much more suited to someone my age. Mindy is the master of quick, simple styles that are still uber cute! The Waterfall French Braid is one of my all time favourites! It is so quick to do, yet I never see anyone wearing it! Looks great on all ages I think. I have also always been a fan of the Hair Wrapped Ponytail, but could rarely get it to hold with bobby pins. Then Mindy the Magnificent came along and I learned how to do it with a topsy tail tool (thanks for mom for keeping that treasure around! Who knew it would come in handy again???). The style is so versatile, quick and beautiful! Try it, your will love it!


Babes in Hairland: this mom is SO lucky! she has three lovely daughters who have the most beautiful, long, thick, blonde hair! I would die for hair like theirs! Their mom is also wicked talented; she is the queen of beautiful up-do's, if you ever have a formal event check her ideas out. I have also learned a lot from her about using bobby pins effectively and thanks to her I am DYING to get my hands on a set of Curlformers (are those not the prettiest curls you've ever seen? And NO heat!!)! If you have long hair I would recommend you check out this do. I wish I didn't have so many layers because that is seriously beautiful. Also, for something fresh and funky (and relatively simple!) try out her cascading braid style, this would be great for a teen!


The Story of a Princess and Her Hair:
This lady has EXTREME braiding skills! I have never seen such precision (so jealous!). Also her pretty little princess selflessly donated her beautiful red locks to Locks of Love recently, does that not just warm your heart?? You go princess! If you have a little one at home this blog has a ton of adorable do's I would love to try, but if like me, you’re looking for more mature styles might I recommend this one? (Headband style :), like I said, OBSESSED!!) I think it's great for summer. I also really love this Woven Easter Basket look. I don't know about the rest of you, but I've never seen anything like it (it’s easy too!! who would have guessed?). Also, for a tween or teen I love this look, its so simple, yet cute (and doesn't she look great with short hair?!)


Girly-Do Hairstyles: Little Beans is such a cutie, look out mom, only a few more years till you will be chasing away a bunch of boys! I read once on this blog that I probably wouldn't find any styles for older girls, but I must correct Jenn, a lot of her styles work really nicely for older girls! Also, Jenn is very laid back about parts and fly aways (much like myself) and I think the easy going, sometimes messy styles work great for teens! Also, she has a TON of different ways to do buns! I love buns, and they are ageless! So rock on over to Girly Dos and you will definitely be inspired. My favourites (this week anyway!) include this adorable 50's do (I am not quite so cute in pigtails, but the big pouf-age looks nice with a side, or regular, ponytail too!) and the beautiful Ribbon Braid (so fancy! yet would also work for a regular day at the office, I love versatility!). This is also the blog that taught me to make a bow out of my own hair. Check this out! Adorable right??

Thank you ladies for all the beautiful inspiration and your hard work! Keep it up! (Hey, this really did make me feel better :)!)
Check back next week for a new style from yours truly.

And my question for y'all, who inspires you? what are your favourite hairstyles from blogs? and what do you do to feel better when your down?

17 June, 2010

Securing a Headband

Right now I am absolutely obsessed with headbands and side ponytails! I cant get enough of either hairstyle, and don't EVEN get me started on dos that combine the two!!


What I really like about headbands is that they look great on girls of all ages. You just need to adjust the thickness and colour to suit your own style.

This tutorial is really basic, but I have been asked by so many people how I manage to keep my headbands in place. And let me tell you, it took me a long time to be able to wear them (I must seriously have the most ill-shaped head imaginable). Also, my head is very small so not many story bought headbands actually fit me, this technique will help keep most in place. However I really like using ribbon or fabric to create my own, in these photos I have on a ribbon, which I got at Walmart. The brown is very neutral in my hair, so the headband is not terribly flashy (which is fun sometimes), but the pink polka dots make it cute and feminine, just the way I like it!

I like to clip my hair up or put it in a ponytail for ease while I do this. Always start with a long piece of ribbon, you can but it down later. Wrap it around the head and make a simple knot in the back, under the hair. If you are using a thick piece of fabric or have really thin hair, you can also use a small elastic (the clear ouchless kind) instead of the knot.


Now secure the headband in place behind each ear by making an "X" over the ribbon.


Take the hair out of your temporary ponytail or clip. Brush it into place and your set for the day.

Headbands are also cute with a number of different dos. Check back and your sure to see more from me this summer, like I said, I'm obsessed! But in the mean time

How often do you wear a headband? What type is your favorite? and what kinds of cute styles do you wear with them?